

Epic Restoration How a carefully-chosen Lamborghini Miura went from rusty to revered

Hunting down a Lamborghini Miura ripe for restoration was about finding the best candidate, not the biggest wreck. That still left plenty for Iain Tyrrell’s team to do Words Nigel Boothman. Photos Jonathan Fleetwood.
‘It was bought as a project – and it hid plenty Filler-clad Miura rescued
Epic Restoration
If you’ve bought a Ferrari Daytona from someone, and you can stay friends with them afterwards, that’s not a bad start to a working relationship. Iain Tyrrell’s Daytona buyer came back to him some while later and mentioned his desire for a Miura, but not a perfect example – one to restore. ‘The idea was always to find a car suitable for a ground-up restoration,’ says Iain, ‘because this gentleman wanted the result to be better than new, while refurbishing original components wherever possible. It would be a nut-and-bolt rebuild and something entirely his own.’
After much searching, Iain and his client identified a likely car for sale in Ghent, Belgium. They went to view it and it ticked the right boxes, so they decided to take the plunge. So what exactly are the right boxes, when looking for a Miura project? Iain explains, ‘We didn’t want a wreck, for instance a car that had been in a big accident or suffered a really clumsy restoration. This one was a P400 from 1968, though it wasn’t registered until a couple of years later, and ended up with a later plate when imported to the UK.’ It looked original and straight enough, but it was tatty and tired.’
Indeed not. If Iain could have seen what was coming, would he have felt so sanguine? ‘Well, you can never tell what you’ll find under the skin. And this one ended up as a bare tub on a rotisserie, with the chassis rails rotted out, the whole thing trying to bend in front of the bulkhead. Yes, it was bought as a project, and it hid plenty of horrors.’
All by hand
Iain Tyrrell has been working on Lamborghinis since the Eighties and he’s also well-known for his YouTube channel, Tyrrell’s Classic Workshop, in which all manner of exotics benefit from his attention. Nothing to fear from this Miura, then?
On the face of it, the Lamborghini arrived at the workshop outside Chester in moderately good condition. It was red, probably an Eighties repaint and holding up quite well. It ran, albeit with some noise and smoke, but otherwise showed the numerous faults of any other 50-year-old Italian classic. The interior was worn and dirty, the loom was a loose assembly of bad earths and potential shorts and the whole car had the tired feel that any restoration aims to eliminate.
High Point ‘At Salon Privé, I guess. Horacio Pagani’s praise and the impression the car made on everyone pleased the owner and my team a great deal’ Iain Tyrrell
First things first, then – to strip the car to a bare structure and discover what lay ahead. Iain’s senior technicians, Marcus Germany and Pete Dodson, removed the interior, the closing panels and the mechanical components, including that mighty transverse V12 in unit with its gearbox. But the truth wouldn’t be revealed until the paint came off. Would it be dipped or blasted? ‘Neither,’ says Iain. ‘I thought it should be done by hand with paintstripper, a scraper or a wire brush. Blasting can be too rough if some sections are thin steel or aluminium and dipping can sometimes leave residues in pits and crevices that later cause problems with the paint.’
The first tentative touches with the sander revealed only one layer of Rosso, but it sat over quite a coating of filler, a pattern they were to find throughout the car. This is usually a bad sign, but on this car, most of the trouble lay away from the outer surfaces. ‘A Miura has big cover panels over the sill structure on each side,’ says Iain. ‘Once they were off, we could see that both sills would need repairs and there was more corrosion in the front and rear bulkheads, for instance where the rear engine cradle met the bulkhead. When we looked underneath, we realised we were going to have to cut the front chassis members back too.’ The Lamborghini’s frontal structure involves large rectangularsection chassis members, the lower ones of which carry a lot of stress from where the lower wishbones mount. Both left and right sections – and the crossmember that links them – had rotted right through their lower surfaces.
James and the giant pear
The car was also trying to flex just in front of the windscreen, and might continue to do so, if reconstructed without a sensible modification. Iain describes it. ‘Our star metalwork guy, James Webber, made up gusset plates to triangulate the joint where the upper chassis boxes meet the scuttle. They were fitted to the last Miuras, the SVs, because it became obvious in period there wasn’t enough stiffness there. With a bit of corrosion thrown in, the situation becomes much worse.’
Low point ‘When you’ve cut the bottom off a Miura’s chassis rails, sills and engine cradle, you know it’s a long way back!’ James Webber
‘Actually, the worst spot was behind the front wheels,’ says James. ‘The coolant pipes travel through on their way to and from the radiator, so with that constant heating and cooling and condensation, plus the muck thrown up from the road, it rots from the inside and the outside.’
The state of the two huge aluminium clamshells, both of which were intact under their thick skim of filler, was cause for optimism. But this was evaporating as James saw how much attention the rest of the tub would need.
‘I had to replace the section at the bottom of the radiator where it had rotted out – that’s the crossmember between those two lower front chassis rails,’ says James. ‘The air vents behind the radiator were corroded too, as were the steering rack mounts, so I rebuilt it all, making repair sections as needed.’
Then he moved on to the back of the car, where the engine cradle is known as the ‘horseshoe’, in Miura parlance.
‘The horseshoe is always damaged by jacking,’ says James, ‘so it was dented, but this area was corroding too, which is hardly surprising because there’s no protection at all. You could look round an original Miura and wonder if they were meant to last 50 weeks, never mind 50 years.’
Rather than simply replace what had rotted, James made an invisible change. ‘I welded in an extra top-hat section into the lower half of the horseshoe,’ he says. ‘It’s stiffer and more durable that way, and I filled it with cavity wax when I’d finished, so it should be there forever!’ James made all his own repair sections, including those with flared holes, as Lamborghini intended. See ‘My Favourite Tool’ to find out how.
The beating heart
While the bodywork repairs proceeded in a shower of sparks from the far corner of the workshop, Marcus Germany got on with the more peaceful task of dismantling the Miura’s four-cam V12. What he found was sooty but saveable – for the most part. ‘It was pretty black in there,’ says Marcus. ‘The bores, piston crowns and combustion chamber were almost sticky with soot, so the car had been running incredibly rich. But once the grime came off, the general condition was good – though the mating face would need a skim and I had to get the valve seats re-cut.’ South of the head gaskets, Marcus measured up the bores and elected to replace the cylinder liners and pistons, bringing the car back to the standard 3929cc. The liners are an interference fit in the base of the block and are both released and re-fitted with the aid of heat to expand the block, like some other aluminium engines of the period. In this case, Marcus used a space heater to loosen the liners’ grip. ‘When I’d cooled it and cleaned it properly, I could apply some Loctite to the base of the new liners, heat the block and drift them in.’
The Miura’s sturdy (and vastly expensive) crankshaft survived with only a polish and with new bearings and seals throughout, Marcus was ready to build up the engine. But first, there was a decision to make. This engine, unlike the V12s in front-engined Lamborghinis, is conjoined with its gearbox and final drive, sharing the same oil supply. There is a modification you can make that keeps the oil for the transmission separate, allowing the use of different grades. ‘We elected to leave the car standard,’ says Iain Tyrrell. ‘It keeps things simple and original, and with modern oils and the limited mileage the car was likely to do, we felt the change was unnecessary.’
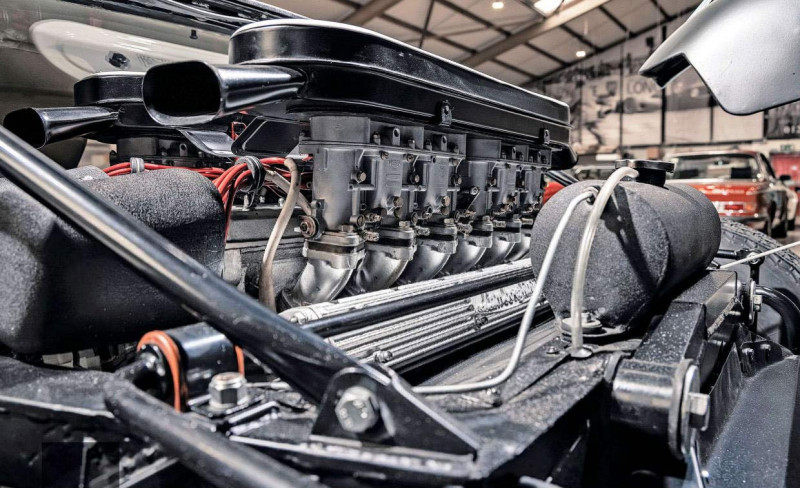
Marcus sent the carburettors – four triple-downdraught Weber 40IDLs – for rebuilding with a specialist Iain trusts for such delicate work, and felt confident the Miura would run better than ever before. Indeed, the full 365bhp offered by the Miura – on paper – should finally be available when the rebuild reached its conclusion.
‘We used an electronic ignition system developed especially for Miuras by Pertronix,’ says Marcus. ‘The original pair of distributors have two sets of points in each and they can be tiresome to time correctly, but with the new dizzies, they’re much easier to synchronise.
Then all you have to do is turn a hex key on each one to move to a different advance curve until the car is spot-on.’
Oh, and that sparkling bare alloy finish on the rebuilt engine – vapour blasting? ‘No’, says Marcus with a smile. ‘Just me with a Brillo pad.’ Everything by hand, remember?
Special order
What colour is this? Iain considers for a moment and says, with a smile, ‘Blu Speciale’. When we dissect this answer, it turns out that ‘Blu Speciale’ can mean just about any shade of blue that was ordered specially by a customer. Iain explains.
‘When you bought a Miura new, you could choose from Bertone’s standard colour palette. But if Sophia Loren walked in and wanted a car matched to her nail varnish, they would try their hardest to do that instead.’
This car was originally Bianco but both Iain and the owner felt it isn’t the best colour to show off the Miura’s contours, so the search began for a favourite shade.
‘We went to quite a lot of trouble to mix up different options,’ says Iain. ‘In the end we sprayed two different blues onto pieces of curved metal and sent them to the owner, which allowed him to make his choice.’
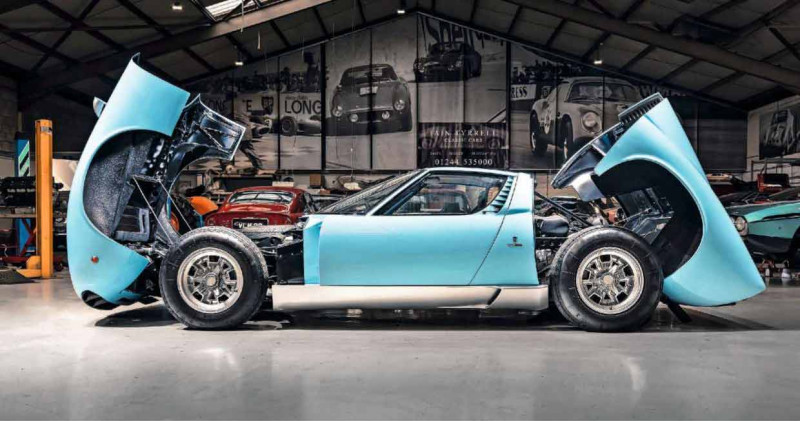
The paintwork was the responsibility of a trusted sub-contractor but before the car left, those beautiful front and rear clamshells and the blade-like doors were dry-fitted and adjusted until the frames, hinges and contours all played nicely together. The paint process was conventional enough, with a satin black finish used underneath the car and on the structure concealed by both clamshells. The door shuts on the tub were sprayed first, along with the inside surfaces of both doors.
This allowed the doors to be fitted, once dry, so the whole centre-section could be painted as one unit to give the most consistent flow and finish across the roof, doors and hip panels. With those immense front and rear hinged sections painted separately, each unit was clear-coated with just enough lacquer to allow cutting back and polishing up with no danger of burning through the colour coat. Meanwhile, Marcus Germany and Pete Dodson were methodically refurbishing the running gear – a task you can’t begin on a Miura without a pencil and paper.
Marcus explains, ‘This Miura, like most of them, had loads of shims in the suspension. They’re usually either 0.5mm or 1.5mm U-shaped shims and they’re fitted in each point of the suspension at all four corners of the car, so if you don’t write down what you find as you go along when you’re removing the wishbones, you’ll spend a very long time getting the alignment right later on. Even the trailing arms are shimmed.’
Marcus and Pete elected to use new springs, the existing ones having softened a bit, but got the manufacturer, Koni, to re-condition the dampers. With every bracket, wishbone, anti-roll bar and trailing arm freshly powder coated, and every original nut and bolt reanodised, the Miura’s painted tub would be able to roll as soon as it came back from the spray booth.
Science – and art
Pete Dodson had seen the state of the wiring loom that came out of the car. A brand new one was called for, though even then it wasn’t straightforward. ‘We had one manufactured to replicate the original, as it should have been,’ says Pete, ‘But the colour codes changed quite a bit so they’re not consistent.’
And just when Pete had got his head around the version that arrived from the maker, he found he had to match it with something more homely. ‘Lamborghini used British Lucas wiper switches and indicators, so it was interesting trying to match the UK wiring colour codes to the Italian colours.’
Pete was working on an almost bare interior, because the loom in a Miura must go in before even basic interior trim can be fitted. There is a rope of wiring travelling up the nearside A-pillar into the roof to supply the bank of six switches by the rear-view mirror… none of which are marked.
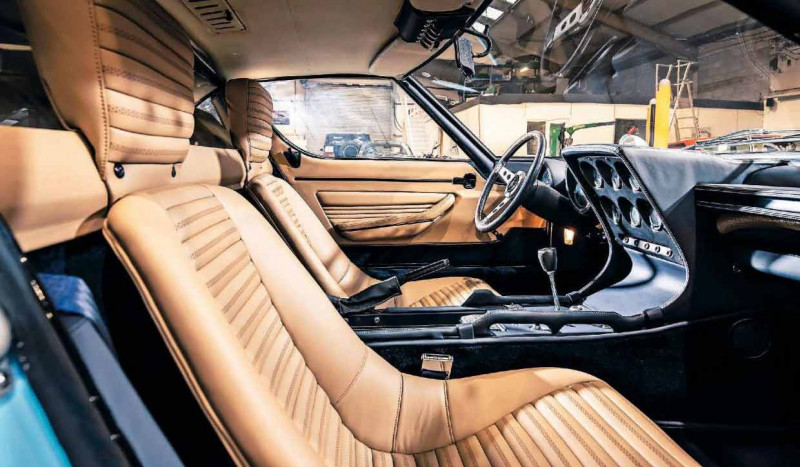
Despite Pete’s patient efforts in preparing the loom for the Miura’s dash and centre console, it’s the leatherwork that grabs your attention. The dark leather on the dash has its edges picked out with pale stitching and the blonde hide on the seats is perforated to a specific pattern of larger and smaller holes, something the leather supplier was able to do by request.
The dash, including both side elements, the instrument pods and the centre console, is all made in glassfibre. Once they were stripped back, Mark Henderson, the in-house trimmer, could repair the cracked and frayed corners of the composite and get the surface ready for scrim foam and then hide, which had to be trimmed very precisely because there is little stretch to give you leeway if the seams aren’t straight. The door cards also asked for more than just a re-covering, because the support on each side for the armrest-cum-handle had broken, as Iain Tyrrell recalls.
‘It was better and stronger to make new ones out of sheet aluminium, folded and welded into a bracket,’ he explains. ‘They could then be fitted to the re-trimmed handle and mounted inside the shallow bins on the Miura’s door cards, where they’d never be seen.
The real challenge lay with the seats. They have ribbed centre sections, with transverse runs of stitching pulling the hide into rolls. ‘It looks like one large ribbed section,’ says Iain. ‘But each roll is trimmed from an individual piece of leather!
‘When you’ve done all 27, you can stitch them onto the four plain pieces on each side that make up the side bolsters. Then it all gets sewn over the seat, which is a glassfibre bucket with another layer of contoured foam.’ Highly labour intensive, of course, but very satisfying when the result is like this.
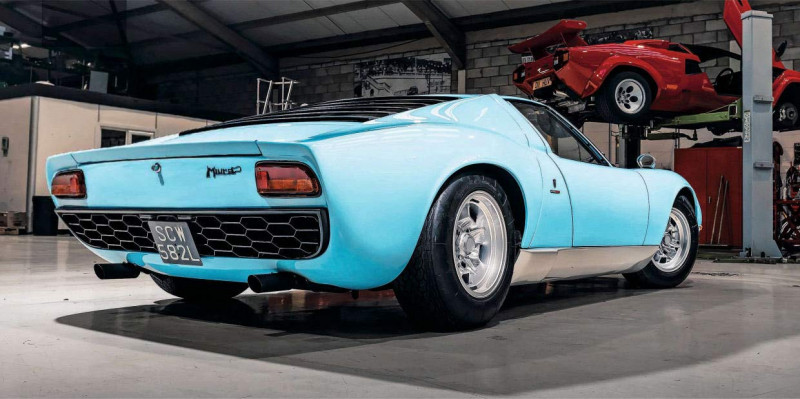
As the car neared completion, it gained a new set of reproduction Campagnolo alloy wheels, with the wider SV-specification under the rear arches.
‘The originals were magnesium and after 50 years can leak air or even crack or collapse from an impact,’ says Iain. ‘The wider ones at the rear fill out the arches properly and the car looks as it should, we reckon, especially on Michelin XWX tyres.’
An invitation to Salon Privé followed, where one man with a certain knowledge of supercars paid Iain the kind of compliment that makes every effort seem worthwhile. ‘Horacio Pagani was very taken with it,’ says Iain of the eponymous supercar company founder, who was previously Lamborghini’s chief engineer. ‘He was climbing in and out and looking all round it, and eventually he said, “If I ever buy a Lamborghini Miura, I want you to restore it.”’
Such praise is very welcome, but the pandemic has meant this fabulous car remains barely run in following the shakeown mileage that the team completed. But it’s still a triumph, says Iain. ‘I once took the Miura used in The Italian Job through the St Bernard pass on the way to meet Marcello Gandini, so boyhood dreams can come true. This car represents a dream for its owner.’
MY FAVOURITE TOOL
Punch and flare tool Ever wondered how those exciting flare-edged holes you see in sports and racing-car structures are made? James Webber explains a process he used again and again on the Miura. ‘I had to re-make structural sections of the tub that have these holes in them. The holes make each piece lighter, of course, but the flared edges that are stretched up away from the hole make the panels stiffer too. ‘All you do is drill a guide hole, find the right size pair of these tools and then wind the two halves together from either side of the workpiece to punch out a disc and flare up the edge.’
As it arrived — red on top, rotten underneath Paintstripper, scrapers and sanding eventually reveals the Miura’s structure Rot extended into front bulkhead-chassis joint, seen from below Marcus Germany talks through the installation of that transverse V12 At the rear, new steel hid stronger top-hat sections in ‘horseshoe’ cradle Glorious ‘clamshell’ panels supported by rot-prone tubes, unprotected when new.
Queue of Weber 40IDLs feeds inlets between the camshafts Oily soot indicated out-of-whack fuelling and general wear Wider SV-spec wheels and tyres fill out rear arches to best effect After repairs, tub was primed with external surfaces filler-skimmed Grimy V12 came to bits without any violence. 27 individual bolsters make up each seat cover — not including headrests Pete and Marcus build on the refurbished running gear GRP dash components immaculately trimmed Miura seats are GRP buckets underneath Iain Tyrrell’s delight with the result is plain to see.