

Epic Restoration How do you restore a 1950 Ferrari 195S when you don’t know who built it?

This mystery of this unique 1950 Ferrari’s origin was unravelled by a detailed restoration – something never foreseen when the car arrived supposedly ready to run.
Words NIGEL BOOTHMAN
Photos JONATHAN FLEETWOOD
‘What would we find under the paint?’
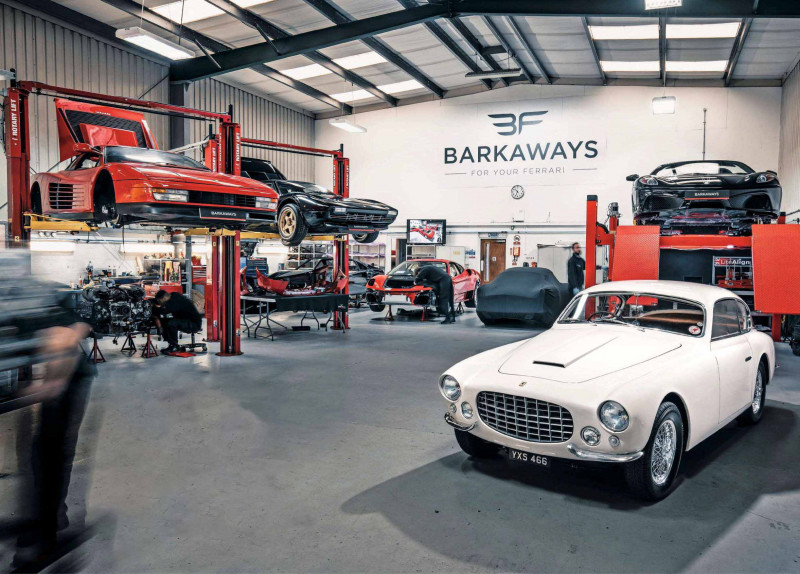
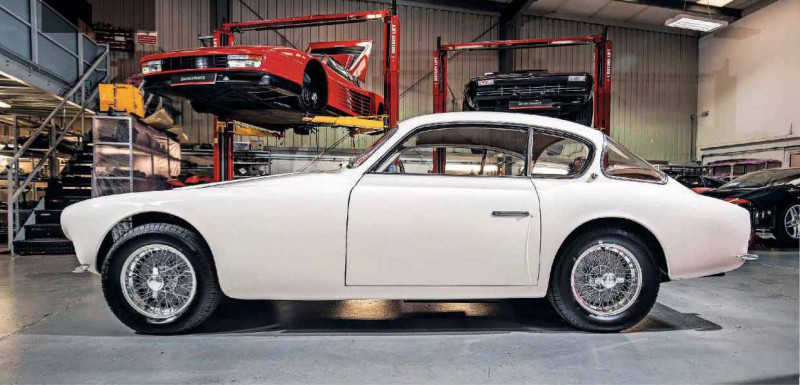
Restoring a mystery Ferrari: the 1950 195S
I bought it on the basis that it would be a nice, drivable thing,’ says owner Keith Neilson. He had been considering a Ferrari, one from the first half of the Fifties with one of the small, musical Colombo-designed V12s, when RM Sotheby’s offered this 195 Inter ‘S’ at its Monaco auction in 2018. Keith inspected the car and investigated its recent history, which involved it being used as a showpiece at Ferrari launches with a dealer in the Far East. It looked very nice, albeit in a somewhat orangey coat of red paint, and was described as being in running condition.
‘I stupidly assumed it had been looked after as a runner,’ admits Keith. ‘So I submitted a winning bid, then had it transported home from Monaco to Scotland. When we fired it up, it ran very rough and after a brief drive across the yard in first gear, the brake pedal went to the floor.’
Low Point ‘Seeing the damage to the cylinder heads and crankshaft. There was a moment when I thought everything might have to be renewed’ Ian Barkaway
Keith’s other classic, a 365GT 2+2, was scheduled to head down to Ferrari specialist Barkaways in Kent for some work, and since the storage company had a two-car transporter, it made sense to send the 195 too. Initially, the brief was just to make it safe and reliable, but when the true state of the engine became apparent and the car’s origin story had piqued Keith’s interest, the mission became a full restoration to the original colour, with an eye on exactly who built the body and in what form.
‘The car was supposedly a Ghia-bodied Inter that had been remodelled with a new nose and tail early in life,’ says Keith. ‘I took that to be accurate but perhaps it wasn’t. I carried on looking into the history while Barkaways studied the car as the team stripped it down. What would we find under the paint?’
Forensic Science
Ian Barkaway and his team is used to working with bits of four-wheeled history and they have a careful process in place to record as much information as possible before any work begins. ‘Research is vital,’ explains Service Manager Ben Barkaway. ‘We have to find out what’s there, and what should be there. All early Ferraris were entirely hand-built and almost everything was stamped. We found body number 113/3005 on the wings, sills and elsewhere. The engine and chassis numbers matched, as on all early Ferraris. The casting number, 166, was correct on the transmission, axle and other components, so it looked to be a nicely original car.’
High Point ‘How can you beat that day at Salon Privé? To see the finished car for the first time, win a prize and drive it around Blenheim Palace was amazing’ Keith Neilson
Armed with that knowledge, the team began removing the driveline, running gear and the interior, which had been skilfully re-trimmed not long before and would be the one aspect of this 195 that did not require attention. The body is in steel, though rather thin and delicate steel, built around a bulkhead over a sturdy twin-tube chassis. The team soon found some endearing hand-made traits, such as the doors being two different lengths. While there was little obvious rot at the surface, light-gauge Italian steel of almost 70 years of age is a recipe for corrosion damage, so the next stage involved a deep breath.
‘It went off to the media blaster,’ says Ben. ‘They use soft soda on cars like this to be as gentle as possible and we deal with what comes back. This is when the archaeology begins, and we could see where the body had been changed.’
And what had been changed wasn’t as dramatic as the Barkaways team expected. There was no obvious cut-line where a previous nose had been removed and replaced, nor anything like it at the tail. The C-pillar’s profile seemed to have been altered and this, with other small signs, suggested the rear screen might be a different shape from that which was there in December 1950, when the car was completed. The bonnet hinges had been moved from the rear to the front.
‘The panels seemed pretty straight for a Fifties car,’ says Ben, ‘and what evidence we did find pointed to minor cosmetic changes, nothing major and not an accident repair, though there were some rough-looking areas under the lead that were probably old corrosion repairs. There was a fair bit of rust too, with the base of the B-pillars and the inner sills quite rotten, some corrosion around the rear screen aperture and a lot of rot in the frame supporting the boot floor.’
One door skin was condemned too; with previous repairs, such corroded, flimsy old steel would be pointless to patch up, so Barkaways’ bodyshop created a new panel. Happily, the Ferrari’s beefy chassis tubes needed no surgery. Which was more than could be said for that Colombo V12.
The horror within
This 195 Inter was ordered with an ‘S’-specification engine, meaning triple downdraught Weber 36DCF3 carburettors and perhaps 180bhp from 2341cc. Remarkably, all three original carburettors – once again, numbered – had survived with the car. That was where the good news ended. Ian Barkaway might be the boss, but he’s a hands-on leader and took on this engine rebuild himself. He describes what he found.
‘The head gaskets had completely given up, with the paper rotting away around the copper rings and allowing coolant to get into the oil. You can’t buy head gaskets for this engine so we had to have them re-made. When I went further down, I discovered the pistons and liners were over-size and not in great condition, so we decided to replace the liners and fit new domed pistons at the standard size.’ The pistons are another special ‘S’ feature, their domed crowns protruding beyond the deck into the combustion chamber in the head for an increased compression ratio. Ian’s approach was to conserve components wherever practicable, so he was glad to find the offset connecting rods could be re-used. But what about the crankshaft? ‘It was marked but not beyond repair,’ says Ian, ‘so we were able to grind it to the second undersize and fit new bearings. But the bearings were incredibly hard to source – in the end the big-end shells alone cost £2500 from Ferrari. Better than a new crank though!’
After the cylinder heads were deep-cleaned, Ian feared the worst – the mating surface looked both pitted and porous. But a skim in the machine shop revealed the damage to be only skindeep, allowing Ian to rebuild what he had, rather than begin the costly search of acquiring or commissioning new 195 heads.
‘These days you can replace the valve hair-springs with conventional coil springs,’ he says, ‘but we were sticking with the original, so with new phosphor-bronze guides, new valves and valve seats, I could build up the valve train with a special shoetype spring compressor that sits across the head.’
Well, almost – there was a major hold up at the end of the engine build. Both camshafts were showing unacceptable levels of wear to the lobes, and of course you can’t buy new Ferrari 195S camshafts, so Barkaways had new ones made. Such specialised work is not often available at short notice and the initial expectation was for a six-month lead time.
However, that estimate came shortly before the pandemic struck and the work ended up taking 18 months. But eventually, with the rebuilt carburettors and a wide variety of new gaskets sourced or created with the support of Ferrari’s service centre in Egham, Surrey, the engine rebuild could be completed.
Whiter than white
With the body repaired and ready for paint, the only question was exactly which colour they should be applying. Matching an old Ferrari colour to a modern formulation should be possible, but in 1950 the paint was applied by the coachbuilder and could be almost anything. When you’re not even sure of the coachbuilder, you have a challenge.
The car was red when it arrived and had been silver at one point too, but with the earliest-known photo of the car showing white paint, the team settled on that. There are, says Keith Neilson, two likely versions of the Bianco used in the early Fifties.
‘Samples on small panels were sent to Edinburgh of Bianco, the final choice, and Bianco Polo Park,’ he explains. ‘The first was chosen because the Polo Park had more of a green cream tinge to it. Also, the original documents for the car all just state “Bianco” too.’
Barkaways’ painter, Rigor Tabbert, describes the preparation before the colour went on. ‘First we did a dry-fit, which is crucial to ensure that no modifications to lines, gaps or contours will be needed after painting – when it’s too late. After the dry fitting, we painted the doors and interior trim pieces first, but the process was the same for all panels – first, an etch primer protects the steel and gives a really safe basis for everything else, then I used a spray filler and began hand-flatting the car.’
There are no short-cuts to achieving a beautiful, consistent surface, which is why Rigor favours doing as much of the flatting of each panel by hand as is possible. He has been working with a relatively new product, a colour-changing filler that starts pink and turns green when fully catalysed and hard, allowing him to move on as rapidly as possible with confidence that the abrasives wouldn’t clog with scratchy lumps of filler dust. The colour coat, that carefully selected Bianco, is purer than an ivory or cream shade but not a stark, bright finish like a modern Ferrari white. In person, it’s convincingly Fifties, even with two coats of lacquer that produce a remarkable glassy shine.
The Ferrari’s running gear, and especially engine, was soaking up plenty of time while the body attained such perfection. And before they could be reunited, there were some interesting challenges to tackle.
Wired-on wisdom
Ian and his team have worked on hundreds of classic Ferraris but the chance to see every nook and cranny of a 195 ‘S’ is still unusual. Each component was tackled in turn, sometimes with a learning curve to climb as restoration proceeded.
‘The clutch is a coil-spring arrangement,’ says Ian. ‘It works backwards to release, in that the cover is pulled back against coil springs. It’s all done with levers so we had to rebuild it with as little play in the mechanism as possible. We also had to get the old clutch discs re-surfaced with new friction material, because you can’t find replacements.’
The clutch will get a lot of use, too, because the gearbox is a non-synchromesh ‘crash’ unit, quite possibly specified for the car’s likely use in hill climbs and other light competition. This would tie in with the ‘S’ specification engine built into the otherwise grand-touring Inter body and chassis. The gearbox was entirely dismantled, with each gear taken off the shafts for inspection, which they passed without need for near-impossible replacement.
‘All the castings for the clutch, gearbox, back axle and so forth were aquablasted,’ says Ian, referring to the popular method of refinishing aluminium castings with a high-pressure blend of water and granular media. ‘It looks lovely. I like to complete the assembly with lock tabs and lock wires where appropriate, for instance on the bolts at the back of the gearbox’s selector rods.’
Ian describes this vanishing skill, which involves sending a wire through a hole drilled across the bolt head, twisting the wire tight with special pliers, passing it through a lock tab or adjacent bolt and then back on itself.
Moving out to the corners, Ian had to have new brake shoes and linings made to replace the worn originals, while keeping close track of the numerous shims Ferrari used to assemble the front suspension for camber, castor and toe. The effort involved in dismantling and reassembling the intimidating front leaf spring required a special tool and deserves a box of its own – see ‘My Favourite Tool’ below.
Bailey builds it
Bailey Charlesworth, Barkaways’ technician, took on a lot of the assembly work as the completed components made their way through the restoration process. Rather than amounting to a well-mapped 3D jigsaw, the task kept presenting Bailey with little challenges that required creative solutions. ‘The doors took a couple of days to build,’ says Bailey. ‘They’re hand-made without any consideration towards things going together easily, so it took a lot of patience. I had to create the little brass trim strips that slide over the bolt heads, and get them chromed – the old ones had been off and on a few times and were done for.’ Bailey also had to replace the pair of coloured gels in the rear lamps. They look like convex lenses but in fact have a flat base so are quite thick, resting against the tail of the car and held in place by the chromed surrounds. With the old ones faded almost white with age, Barkaways had to source reproduction units, made specially by a company in Italy.
‘At least the radiator grille slats are marked with numbers, so it’s easy to get everything in the right order,’ says Bailey. ‘The bumpers were harder; they’re a simple shape but they’re rubber-mounted and it took ages to align everything perfectly before tightening them on.’ Bailey fitted a new headlining, the fresh carpets and the car’s already very smart seats, building the dashboard with a new loom and the refurbished Jaeger instruments that were another special feature of the car’s original order. The exhausts were a puzzle, having taken various different forms in the past, but the team discovered cut-out alcoves in the chassis that suggested oval silencers, so they fitted a suitable new custom-made mild-steel system.
Throughout this process, around half of which had been completed during the various lockdowns, Keith Neilson had never seen the car. Edinburgh is a long way from Kent, even when you’re permitted to travel. So the first time he saw the finished product was as the covers came off at Salon Privé 2021.
‘It was quite a moment,’ he says. ‘The car won a prize [second in the Post-War Closed category] but the show was interesting in other ways too. One judge said the door hinges were like those made by Touring. Then, also on display, there was a Fifties Alfa Romeo with a Touring body. The owner pointed out that the body numbers on the 195 were in the right range for Touring in 1950, which they’re not if you compare them to Ghia or Vignale.’
Yes, as the restoration finished up, Keith had been getting closer to what he believes is the car’s true identity. Confusion arises, says Keith, not least because of a mis-captioned photo in an old Ferrari book, mixing up his car with a Ghia-bodied car parked next to it. Tables in other books variously list the car as Touring, Ghia or Vignale, and a previous owner in the USA took the Ghia theory so far as to have reproduction Ghia badges made and fitted. ‘I’ve now got an early photo of the back end of this car; I can identify it by the Italian number plate in shot, which it only wore for a couple of years,’ says Keith. ‘There, on the boot lid above the Ferrari badge, is Touring’s “T” badge.’
Was this removed for a re-paint and never replaced? When Keith’s evidence is added to the unexpectedly limited changes discovered by Barkaways, the initial theory of a standard 195 Ghia receiving a new nose, tail and roofline seems far less likely. ‘It’s been great to do a car for an owner who’s so enthusiastic,’ says Ian. ‘Keith’s done lots of research and worked on the history throughout. He wanted it as something he could enjoy driving and the whole detective aspect of the story came later, but it’s only made this restoration more satisfying.’
MY FAVOURITE TOOL
Leaf spring spreader
‘The 195’s front suspension relies on a large leaf spring fixed across the car, beneath the front crossmember. Removing the spring and especially dismantling it to individual leaves for cleaning and greasing requires a very sturdy piece of kit to remain stable while flattening the spring. We made this from large pieces of steel boxsection and it’s come in handy for a few early transverse-leaf Ferraris. Large bits of studding at each end get wound down to flatten the spring and take up the tension, allowing you to remove the bolt that passes through the springs in the middle of their arc before gently releasing everything.’
The strongest origin theory now is a Touring body; the company still exists but its records don’t date back far enough to confirm.
Building the doors was an arduous task; dashboard comes next.
New carpets chosen to tone perfectly with the tan leather.
Jaeger instruments refurbished; hide was perfectly wornin and wisely left.
Pondering the history with Ben Barkaway — altered shape seems unlikely now.
Original gels faded almost colourless.
Working through the foundation coats in the spray booth.
A mechanical stripdown before everything is cleaned, assessed and refurbished.
Rigor Tabbert shows importance of consistent surfacing.
Bailey Charlesworth shows how grille slots together from 14 numbered pieces.
Gears and their shafts stripped entirely to check for damage.
Differential given new bearing races and a deep clean.
Ian’s fondness for lockwires guarantees that vital fittings stay put.
The 195 was built before Ferrari settled on mainly Pinin Farina bodywork.
Shiny paint and wheels hid corrosion underneath and a very rough engine.
Running gear and fuel tank laid out after stripping.
Nose in protective primer after blasting; small repairs marked up but no apparent join to be found.
Roughest area was A-pillar; previous bodges were cut out and done properly.
Ian Barkaway built the jewel-like 2.3-litre V12 himself, and found plenty to put right.
State of the heads was alarming but both were saved.
Frame beneath boot floor was utterly rotten.
Almost there, but for delayed camshafts.