

Epic Restoration 1971 Dino 246GT

Gary Bates and his TRGB team had to dig deep to bring a rotten 1971 Dino 246GT back to this condition – and finding some of theparts, strewn around several locations, meant scaling new heights.
Dino from rat’s nest to perfection
Words EMMA WOODCOCK
Photos ALEX TAPLEY
‘Rustier than a fisherman’s bucket in a salt mine’
Epic Restoration Triumph specialist takes on Ferrari’s delicacy – a rusty Dino 246GT
How to restore a rusty Dino 246GT? First you have to find the rest of it...
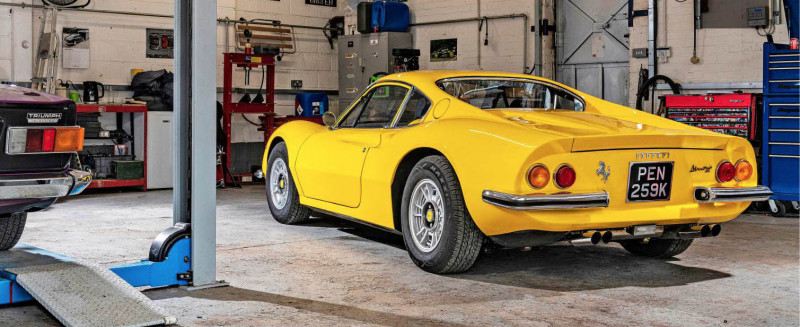
I look back at where I started and I can’t believe that we’ve done all that.’ Gary Bates is no stranger to classic car restoration. As founder of Cambridgeshire Triumph specialist TRGB he’s overseen hundreds of renovations ranging from TR sports cars to Jaguar E-types, but none quite like this. The 1971 Dino 246GT in Giallo Fly is his childhood dream car, rescued from a rusted and denuded rolling bodyshell by 11 years of investigation, fabrication and patient reassembly.
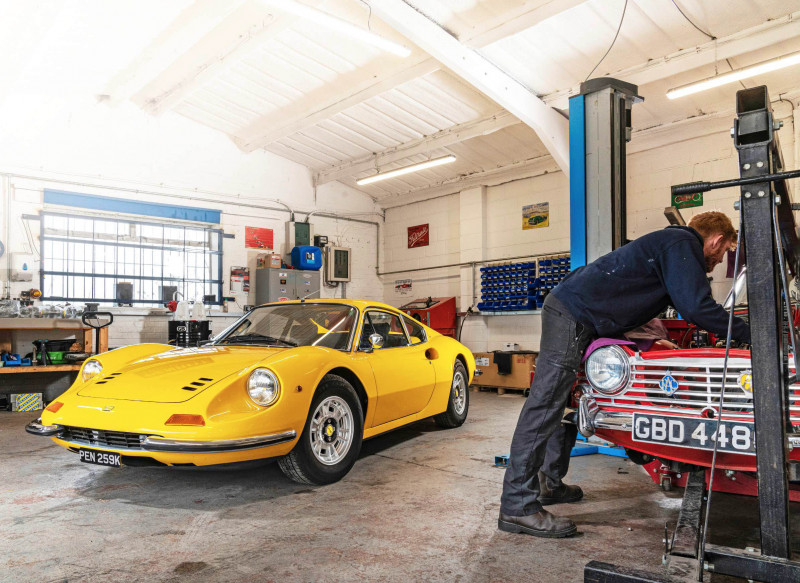
Despite its desperate condition when found, he counts himself lucky. ‘I wasn’t actively searching – the Dino just turned up! An autojumbler walked into our workshop one day, spotted a photo of the last 246 I refurbished on the wall and told me he knew of another.’ Stripped decades earlier for a stalled restoration, the basic structure was stored in a local barn. ‘It was awful and I knew I’d have a rough time, but I’ve always wanted to own a Dino and this one cost what I could pay up front. After four decades in the business, I assume every car is 40 per cent worse than I hope. I went in with eyes wide open.’ The rest of the car was strewn a mile down the road, scattered between the Barkway village garage, a house and a two-storey barn. ‘It was full of junk,’ Gary reflects. ‘I was wading through rat droppings and owl pellets – and I’ve never seen so many Forties gas masks in one place.’ Rescuing the Dino components was an intricate operation. ‘I was looking everywhere and pulling shelves apart, all the while trying not to bring the place down around me. When I found the bonnet, it was teetering on top of a rubbish pile. Dinos rust like nothing else and mine was already so thoroughly dismantled that I could see every last bit of corrosion.’
High point ‘Starting the engine. My wife Leanne turned the key and I had my head in the engine bay. It was spitting and coughing, but it fired on all six!’ — Gary Bates
He spotted a damaged front panel and a rat’s nest of wiring, but there were enough positive signs to continue. ‘The chassis was complete, which meant the car still rolled. That was a big win.’ Scouting through a nearby barn loft revealed the engine board, host to the Dino’s VIN plate. Gary also located both original doors, though they wouldn’t stay with the car for long. ‘A friend needed to finish his Dino project urgently, so I sold them to him. I regret that. The handmade replacements caused endless trouble. They’re just wrong. I spent days trying to mount the car’s original glass to the new doors, only to discover there’s no felting combination that can make them fit. The top of the frame was three quarters of an inch too short for the window, so I got out my hacksaw and set to work.’ He fabricated an extension, then tried to hang the doors.
Low point ‘Fitting the quarterlights to the doors was awful. I’m still not happy with them. Every part is handmade – and even though I trial-mounted everything beforehand, nothing seemed to fit after paint’ – Gary Bates
‘We couldn’t move the welded hinges, so we made all our adjustments by precisely tailoring the metal flange that the coachbuilder, Scaglietti, originally fitted to the back of the upper door frames.’ Similar effort perfected the quarterlights. ‘I sourced the last remaining hinge from Maranello Classic Parts, then thought up a better solution for the catches. Ferrari only glued them in place, so I bought a pair of period Fiat items, modified them to halve their thickness, then welded them into shape to wrap around the glass. They’re visually indistinguishable and they won’t fall off like the originals.’
The TRGB bodyshop team rectified the rest of the metalwork. ‘We bought the offside front wing, nearside headlight panels, sills, side chassis panels, rear quarters and rear wheelarches. The Dino has a handmade body, so every last part had to be adjusted. It’s dolly and hammer work all the way, playing with parts until they finally fit. For smaller sections, we made our own repair sections, rebuilding the rear chassis and fabricating the complex curve that connects the wings to the back window.’ Reconstructing the interior panels revealed legacy damage. ‘Both rear wheelarches were much too short and one of the glassfibre inner arches had a length of aluminium pop-riveted across it to reach the bodyshell. I’d never worked in glassfibre before, but I remade them all. The cooling system header tank brackets were also awry; one was five degrees out from the other. I could tell from the twisted mounting rubbers that they’d been built that way, but I still rewelded them to correct the build fault.’
Dino expert Dave Norris advised on other alterations – and one little-known feature to retain. Says Gary, ‘His knowledge is invaluable. He made up a pair of stainless steel end plates for the engine bay service panels – because the originals rust like mad – and his technician lent me their bespoke tool to form the door escutcheons. That’s the section behind the interior door opener. Dave even taught me about the factory-correct gap between the inner sills and the B-post, which most restorers erroneously weld together. They’re still separate on my car as a result.
‘I found the engine standing in the corner of a bodyshop, covered in a quarter inch of oil and filler dust from the decades it spent there. At least the carburettors had been taped up,’ Gary muses. ‘Opening it up revealed that all the waterways had corroded and the pistons only came out when I used a hammer to persuade them. But the crankshaft journals were still inside Ferrari tolerances. Just.’
Getting to the heart of the matter
Specialist Ivor Searle revived the 2.4-litre V6. ‘We pressure- and crack-tested the cylinder heads before fitting new valves, guides, buckets and springs,’ says Workshop Manager Trevor Gilbey. ‘We also cleaned and rebored the block, then polished and fitted new camshafts.’ The uprated Superformance cams would almost trip up Gary when he started to rebuild the engine at home. ‘I didn’t have my brain in gear when the distributor was built! The original ignition timing is six degrees before top dead centre to give 40 degrees total, but the mixture of better camshafts and modern fuel makes the Dino happier at ten degrees ignition. That adds an undesirable four degrees to the total, so I started to weld bits of metal on the bob weights to restrict their movement, then filed them back for a satisfactory advance curve. It was trial and error. ‘Setting the timing is tricky.
I had to make sure the chains were under tension and rotating the right way, with the non-sequential cog gears all set to the right position, but the markings on the cams really help.’ Overall he enjoyed the experience. ‘Anyone who can rebuild a Fiat Twin Cam can rebuild a Dino V6, though I had to use all my engineering background to get the bolts correctly sized. Ferrari used to make its own fixings and often employed a thread one step finer than I expected. Take the engine casing for example. Every bolt is 1.25mm… apart from the three that aren’t.’
TRGB’s Frazer Unwin and Wayne Huggins craned in the finished engine. ‘It’s a really tight job,’ they recall. ‘We removed the wheels to get the car low enough and had to whip all the wheelarch liners out for access. Reaching to bolt everything up is a challenge, but the engine block dropped straight onto its mounts. There isn’t space for it to do anything else!’
An archaeological ascent to the interior
‘Everything inside had been stripped out and the owner had lost the parts,’ Gary grimaces. ‘I spent three months searching the barn on my knees, yet I was still short the chairs, dashboard and instrument panel. There was just one place left to look. So I climbed up above the old owner’s office and came face-to-face with a dusty chest. Lifting the lid was a Hollywood moment. It contained all the smaller bits I needed, with the seats perched alongside.’
He repatriated the parts for closer inspection, discovering one of the seat backs was missing. Reluctant to spend big on a genuine Ferrari replacement, the hands-on restorer set to work. ‘Luckily the structure isn’t handed and the other seat was complete, so I could craft a mould from the original. They’re made from glassfibre mat and resin. Once I applied the gel coat, any smaller pitting disappeared and the finished product was only a millimetre wider than the original, so I just fitted the mould instead of using it to make another seat back.’
Assembling the correct trim materials was a bigger challenge. ‘I spent months tracking down the correct “mousehair” flocked vinyl dashboard covering, before I found trimmer Henk van Lith in Holland. He directed me to the Italian firm that makes the door cards.’ Gary spent the next six months trying to buy the material. ‘I finally emailed them after tipping my message into Google Translate, rather than in English. That did the job!’ He mounted them to self-designed MDF backing panels.
Home-spun ingenuity combined with an expert touch when it came to the wool carpeting. ‘I needed to make patterns and found the perfect material at an NEC event – our show stand flooring! Its flexibility let me trace every part of the cabin for my trimmer.’ Ian Hawkes of P&M Taylor stepped in to cut and bind the carpets, re-cover the dashboard and upholster the seats.
‘I won’t charge into anything,’ Ian explains. ‘Fitting the “mousehair” dashboard is all about remembering its value – 350 euros for a metre and a half – and taking time to get every part of the ribbed underside facing the same direction.’ He cut the carpets with the same painstaking attention to detail – including one piece that had been missed in the initial trim session – then tackled the chairs. ‘I copied the pre-existing covers to make an initial pattern, then focused on the awkward aperture Ferrari built into the seat backs. It demands patience, so I iterated localised patterns before fitting the leather.’
This meticulous approach contrasts strongly with how the car was originally put together at its birthplace, it seems. ‘Ferrari really bodged the Dino on the assembly line,’ Gary reflects as we duck under his 246 while it’s up on the ramp. ‘Look into the front left wheel well and you can see the telltale scuffs where the tyre rubs against the body, which becomes a concern when you realise that the brake line and battery cable run just underneath! ‘Maranello riveted a metal lip over the top for protection – which I’ve retained – but we’ve opened up the steering rack and fitted a pair of spacers to reduce steering lock and actually fix the problem.’ Cleaning up the casting revealed a maker’s mark – Cam Gears of Luton. ‘I started researching and discovered it’s shared with an early Mini Cooper!’
Mechanical machinations and missing trim
Competition Transmission Services rebuilt the gearbox, with Gary refitting and adjusting the linkage, while the brake calipers and wishbones also received external refurbishment. Other components were too corroded to save, not least the twin petrol tanks. ‘They’re aluminium and rot horribly once moisture seeps up between the tanks and the underseal. Working with Colin at Superformance, I sent my original tanks away to Pro Alloy Motorsport for replication. They’ve still got them today, to use as templates for future Dino orders.’
Reassembling the braking system pushed Gary’s perseverance to its limit. ‘The brake pipe is a single, continuous piece that slots all the way through the car. I formed it myself with a specialist hand tool. It took hours. I carefully formed each individual kink, slowly feeding the pipe through the sill, only to cock up the final bend. I’d ruined it at the last hurdle. All I could do was turn around, head back to the house and try again another day.’ He searched for period parts with the same tenacity. ‘I wanted to use original Ferrari parts wherever possible, so I spent hours researching online and even longer combing through autojumbles to find the right brake components.’
Gary’s struggles to get his Dino finished still weren’t over when the car finally hit the road. Phantom brake fade plagued the running-in process and he searched tirelessly for the culprit. ‘The pedal just wasn’t right. I checked the master cylinder adjustment, then the shims, then the calipers, before I finally examined the one-way valve that sits in the engine bay and sends vacuum to the servo. The original worked perfectly well when I’d tested it, so I hadn’t bothered with a rebuild. After all that, I bought a replacement for a tenner!
‘No end of detail parts were missing,’ Gary adds. ‘There are some I still haven’t found; not least the unattainable chrome-on- brass gutter trims, but I worked hard to make or locate everything we could. Dave Norris lent me his patterns to remake both top door rails and we made rear window finisher here at TRGB, while the front windscreen finishers took years to source.
‘The finishers had been absolutely impossible to find when I started the restoration, so I ended up collaborating with a fellow Dino owner in Germany to see if we could get a couple of pairs remade. To cover my bases, I also put my name down with Ferrari, just in case the factory every decided to remanufacture them.’ Eventually Maranello Classic Parts came through, but at a price. ‘They cost £1000 a side and I needed two. I was offered courier delivery – but there was no way I was going to take that risk. The finishers are such long, delicate and valuable pieces, so I drove straight over to MCP’s premises in Egham, Surrey, to collect them myself.’ Gary took an equally hands-on approach to renovate the headlamps. ‘Original lights really stand out when you look at a Dino and I was determined to keep mine.
The glass was smeared with rust and old paint, but by patiently applying cellulose thinner, I started rescuing them. A quick trip round the dishwasher and they were done!’ A chroming specialist copper flashed, polished and re-silvered the light bases, but Gary hit a snag on their return. ‘The finish was just too thick, so I had no option but to trim back the edges. I spent four hours with a fine metal file getting the job done – I was so paranoid I’d break something!’
A Ferrari with a better-than-factory finish
‘I’ve been rebuilding cars for 40 years, but the Dino still took four years longer than I expected,’ Gary muses. ‘All I could do was stay patient and keep working on the car every week, even if there were days when I had to walk away. The engine and the suspension are beautiful pieces of engineering, but the rest of a Dino is thrown together from the factory, which makes it very challenging to finish properly.
‘I’m so glad I persevered though. If I hadn’t tackled this restoration, the 246 would have been out of my reach forever. And it’s a lovely thing to drive, with light steering, sweet handling and a noisy engine. The Dino lives up to the dream – it’s all been totally worth it.’
Correct Carillo indicators match original headlights TRGB made rear finisher from scratch Wheel turns Mini Cooper-sourced Rack
MY FAVOURITE TOOL
Seal removal tool
‘This Snap-on tool (SGSR104) proved invaluable for fitting interior trim to the Dino,’ says Gary Bates. ‘It provides a set of panelled, tooled curves that can ease trim into rubber without puncturing the seal and push leather up into awkward corners without nicking the hide. I saw a set in my colleague Mark’s tool box and I just had to get my own set. They’re fantastic!’
Former electrical engineer Gary rebuilt stray wiring.
The binnacle was found in the last place he looked…
Repro wheels fitted to replace aged magnesium originals P&M Taylor had only upholstered one Ferrari before Vinyl from Italy, MDF backing board by Gary New escutcheon backing was needed for the door pull. Calipers boast new pistons and seals.
New tanks – ProAlloy kept the originals for templates.
Tired but complete suspension.
Bodyshell found a mile away from all its components Glassfibre floor cracked along original seam to remove Setting gearbox linkage is a two-person task.
Cam covers sealed after running in Ferrari badges were fitted when near-new.
Engine suffered from two decades in a bodyshop.
Matching new doors to the handmade body took months.